Cycling photography is an exciting and challenging genre that captures the energy and excitement of cycling. Whether you’re a professional photographer or a passionate cyclist with a camera, mastering the art of cycling photography requires a combination of technical knowledge, creativity, and patience. In this article, we’ll explore some techniques and tips for capturing stunning cycling images, from choosing the right equipment to finding the perfect location and capturing the action at just the right moment. So put on your cycling shoes, grab your camera, and let’s get started!
Essential Equipment for Cycling Photography
Cameras and Lenses
Cycling photography requires specific equipment to capture the perfect shot. While there are many different cameras and lenses available, the following are some of the most essential for cycling photography:
DSLR or mirrorless cameras
DSLR (Digital Single-Lens Reflex) or mirrorless cameras are popular choices for cycling photography because they offer fast autofocus and image stabilization. DSLRs have a mirror that reflects the light from the lens to the optical viewfinder, while mirrorless cameras do not have a mirror and instead use an electronic viewfinder or the rear screen to preview the image.
Wide-angle lenses
Wide-angle lenses are essential for capturing the scenery and the cyclist in a single shot. They offer a wider field of view, allowing you to capture more of the surrounding environment while still keeping the cyclist in focus. Popular wide-angle lenses for cycling photography include the 16-35mm f/2.8 and the 14-24mm f/2.8.
Telephoto lenses
Telephoto lenses are useful for capturing close-up shots of the cyclist from a distance. They allow you to zoom in on the cyclist while keeping the background in focus, creating a professional and dramatic effect. Popular telephoto lenses for cycling photography include the 70-200mm f/2.8 and the 200-500mm f/5.6.
Tripod
A tripod is essential for stabilizing your camera and ensuring that your shots are sharp and clear. Cycling photography often involves capturing shots at slow shutter speeds, which can result in blurry images if the camera is not stabilized properly. A tripod will help you keep your camera steady and ensure that your shots are perfectly framed.
Overall, the right camera and lenses, combined with a sturdy tripod, can help you capture stunning cycling photos that capture the beauty and excitement of the sport.
Accessories
- Cable release or remote shutter: A cable release or remote shutter is essential for cycling photography as it allows you to capture sharp images without the risk of camera shake. A cable release allows you to trigger the camera’s shutter from a distance, while a remote shutter allows you to trigger the camera’s shutter with a remote control.
- Polarizing filter: A polarizing filter is an essential accessory for cycling photography as it helps to reduce glare and reflections, resulting in more vibrant and saturated colors. A polarizing filter can also help to enhance the colors of the sky and foliage, making them appear more vivid and rich.
- Microfiber cloth: A microfiber cloth is a must-have accessory for cycling photography as it is useful for cleaning your lenses and sensors. It is essential to keep your lenses and sensors clean as it can affect the quality of your images. A microfiber cloth is soft and gentle on your equipment and is an essential tool for keeping your gear clean and in good condition.
- Backpack or bag for carrying gear: A backpack or bag for carrying gear is essential for cycling photography as it allows you to carry your equipment and other essentials such as food, water, and clothing. A backpack or bag should be comfortable to wear and have enough space to carry all your gear. It is important to choose a backpack or bag that is durable and can withstand the rigors of cycling and outdoor photography.
Composition for Cycling Photography
Framing the Shot
When it comes to capturing stunning cycling photographs, framing the shot is crucial. Framing involves the way you compose the image by selecting and arranging the elements within the frame. Here are some essential tips to help you master the art of framing in cycling photography:
- Rule of Thirds: The rule of thirds is a fundamental principle in photography that involves dividing the frame into thirds both horizontally and vertically, creating nine equal parts. By placing the subject at the intersection of these lines or along them, you can create a more visually appealing and balanced composition. This technique can help draw the viewer’s eye to the subject and make it stand out in the image.
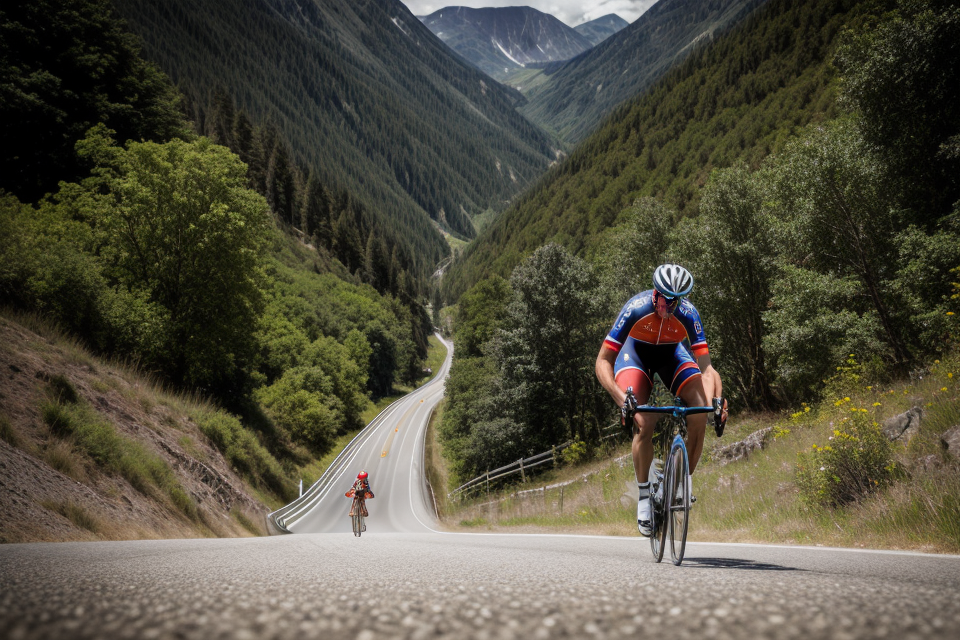
- Leading Lines: Leading lines are lines in the image that lead the viewer’s eye from the foreground to the background or vice versa. These lines can be used to create a sense of depth and guide the viewer’s eye to the subject. For example, you can use the road or a path as a leading line to lead the viewer’s eye to the cyclist.
- Depth of Field: Depth of field refers to the range of distance in an image that appears in focus. By adjusting the aperture, you can control the depth of field, making either the subject or the background more or less blurred. A shallow depth of field can create a dreamy effect and draw attention to the subject, while a deep depth of field can capture more of the scene in focus. Experimenting with different depths of field can help you achieve the desired effect in your cycling photographs.
Capturing the Action
When it comes to capturing the action of cycling, there are several techniques that can help you get the perfect shot. Here are some of the most effective methods:
- Panning technique: Panning is a technique where you follow the cyclist with your camera while continuously pressing the shutter button. This creates a sense of motion and blur in the background, which can add drama and excitement to your photos. To achieve this effect, you need to pan at a speed that is slightly slower than the cyclist’s speed. You can also experiment with different shutter speeds to create different effects.
- Freezing the action: Another technique for capturing the action is to freeze the cyclist in motion. This can be done by using a fast shutter speed, typically around 1/1000th of a second or faster. This will freeze the cyclist in mid-air, creating a sense of movement and energy in the photo. To achieve this effect, you need to be able to anticipate the moment when the cyclist will be at their highest point in the air.
- Using a remote shutter: If you’re using a camera with a remote shutter function, you can use this technique to capture the action without having to press the shutter button manually. This can be useful when you need to keep your camera steady while taking a photo. To use a remote shutter, you simply press the remote shutter button at the moment when the cyclist is in the perfect position.
By mastering these techniques, you’ll be able to capture stunning images of cyclists in action. Whether you’re photographing a professional race or just a casual ride with friends, these techniques will help you get the perfect shot every time.
Lighting for Cycling Photography
Natural Light
Capturing the perfect shot of a cyclist in motion requires careful consideration of lighting conditions. Natural light is a popular choice among photographers, as it can create stunning images with a soft, warm glow. Here are some techniques to keep in mind when working with natural light for cycling photography:
Golden Hour
The golden hour is the period of time just after sunrise or before sunset when the sun is low in the sky. During this time, the light is soft and warm, creating a dreamy effect that is perfect for cycling photography. To make the most of the golden hour, consider the following tips:
- Scout your location ahead of time to find the best spot for capturing the cyclist
- Use a tripod to keep your camera steady and avoid camera shake
- Experiment with different angles and perspectives to find the best composition
Side Lighting
Side lighting is a technique that involves positioning the sun to one side of the subject, creating a dramatic, directional light. This type of lighting can add depth and dimension to the image, highlighting the cyclist’s form and creating a sense of movement. To achieve side lighting, consider the following tips:
- Position the subject so that the sun is to one side of them
- Use a reflector or fill-in flash to add contrast and depth to the image
- Experiment with different angles and positions to find the best composition
Backlighting
Backlighting is a technique that involves positioning the sun behind the subject, creating a halo effect around the cyclist. This type of lighting can create a dramatic, high-contrast image that draws the viewer’s attention to the subject. To achieve backlighting, consider the following tips:
- Position the subject so that the sun is behind them
By mastering these natural light techniques, you’ll be well on your way to capturing stunning cycling photographs that showcase the beauty and power of the sport.
Artificial Light
When it comes to cycling photography, capturing the perfect shot can be a challenge, especially when shooting outdoors. One way to overcome this challenge is by using artificial light. In this section, we will discuss the different types of artificial light that can be used in cycling photography and the benefits of each.
Flash
Flash is one of the most common types of artificial light used in cycling photography. It is a powerful light source that can be used to freeze motion and create sharp images. Flash can be used both on and off-camera, depending on the desired effect. On-camera flash is easy to use and can be adjusted to control the intensity of the light. Off-camera flash, on the other hand, allows for more creative control over the lighting and can be used to create dynamic and unique images.
Off-camera flash
Off-camera flash is a popular technique among cycling photographers because it allows for more creative control over the lighting. This technique involves placing the flash unit off the camera, which can create a more natural and pleasing light. Off-camera flash can be used to create a variety of lighting effects, including soft and diffused light, dramatic shadows, and bold highlights.
Reflectors
Reflectors are another type of artificial light that can be used in cycling photography. They are portable and easy to use, making them a great option for photographers on the go. Reflectors work by bouncing light back onto the subject, creating a soft and natural lighting effect. They can be used both indoors and outdoors and are especially useful when shooting in low light conditions.
In conclusion, artificial light is a powerful tool that can be used to create stunning cycling photographs. Whether you choose to use flash, off-camera flash, or reflectors, the key is to experiment and find the lighting setup that works best for you and your subject. With practice and patience, you can master the art of cycling photography and capture breathtaking images that will inspire and delight.
Tips for Capturing Stunning Images
- Scouting locations in advance
- Planning the shot
- Being prepared for different lighting conditions
- Experimenting with different angles and perspectives
When it comes to capturing stunning cycling images, there are several tips that can help photographers achieve their goals. One of the most important factors to consider is lighting. In this section, we will discuss some tips for capturing stunning cycling images using the right lighting techniques.
Scouting Locations in Advance
One of the most important tips for capturing stunning cycling images is to scout locations in advance. This means finding the perfect location to capture your shot, whether it’s a scenic road or a mountain trail. By scouting locations in advance, you can plan your shot and be prepared for the best lighting conditions.
Planning the Shot
Once you have found the perfect location, it’s time to plan your shot. This means deciding on the angle, perspective, and composition of your shot. By planning your shot in advance, you can ensure that you are ready to capture the perfect image when the lighting conditions are right.
Being Prepared for Different Lighting Conditions
Another important tip for capturing stunning cycling images is to be prepared for different lighting conditions. This means having the right equipment, such as reflectors or flashes, to help enhance your shot. By being prepared for different lighting conditions, you can ensure that you are ready to capture the perfect image at any time.
Experimenting with Different Angles and Perspectives
Finally, it’s important to experiment with different angles and perspectives when capturing cycling images. This means trying out different angles and perspectives to find the perfect shot. By experimenting with different angles and perspectives, you can find the shot that best captures the essence of cycling.
Editing Cycling Photographs
Editing cycling photographs is an essential step in creating stunning images that capture the essence of the sport. With the right tools and techniques, you can enhance your photographs and bring out the best in your shots. Here are some tips for editing cycling photographs:
- Adjusting exposure and contrast: One of the most important aspects of editing cycling photographs is adjusting the exposure and contrast. This can help bring out the details in the photograph and make it look more vibrant and dynamic. You can use tools like the histogram and levels to adjust the exposure and contrast of your photographs.
- Cropping and framing: Another essential aspect of editing cycling photographs is cropping and framing. This can help you to focus on the most important elements of the photograph and create a more dynamic composition. You can use tools like the crop tool and the rule of thirds to frame your shots and create a more compelling composition.
- Removing blemishes and imperfections: Cycling photographs can often be affected by blemishes and imperfections, such as dust spots, sensor marks, and lens flares. Removing these blemishes and imperfections can help to create a more polished and professional-looking image. You can use tools like the spot removal tool and the healing brush to remove blemishes and imperfections from your photographs.
- Adding special effects: Finally, adding special effects can help to enhance the mood and atmosphere of your cycling photographs. This can include adding a color grade, using filters, or adding textures and overlays. You can use tools like the adjustment layers and the layering tools to add special effects to your photographs.
By following these tips, you can edit your cycling photographs to create stunning images that capture the excitement and energy of the sport. Whether you’re a professional photographer or a hobbyist, these techniques can help you to take your cycling photography to the next level.
Safety and Ethics in Cycling Photography
Staying Safe
As a cycling photographer, it is essential to prioritize safety and ethics while capturing stunning images. Here are some tips to help you stay safe while cycling and taking photographs:
- Following local laws and regulations: Always follow the local laws and regulations when cycling and taking photographs. This includes wearing a helmet, following traffic rules, and respecting the rights of other road users.
- Respecting the rights of others: As a photographer, it is important to respect the rights of others. This means being mindful of people’s privacy and not taking photographs of individuals without their consent. Additionally, be aware of any signs or indications that suggest photography is not allowed in a particular area.
- Using caution when crossing roads or riding on trails: Cycling photography often involves crossing roads or riding on trails, which can be dangerous. Use caution when crossing roads, and always look both ways before proceeding. When riding on trails, be aware of other trail users and give them plenty of space. Additionally, be mindful of the terrain and any obstacles that may be in your path.
Ethical Considerations
As a cycling photographer, it is important to be mindful of ethical considerations to ensure that your images are respectful and do not harm others. Here are some key ethical considerations to keep in mind when taking cycling photographs:
- Obtaining permission before photographing individuals or private property: It is important to obtain permission before photographing individuals or private property. This includes getting permission from the property owner before taking photographs of their property, and obtaining consent from individuals before photographing them.
- Respecting the privacy of others: It is important to respect the privacy of others when taking cycling photographs. This means being mindful of where you are standing and whether you are invading someone’s personal space. It is also important to be respectful of people’s homes and property, and not to take photographs that could be seen as intrusive or inappropriate.
- Not contributing to the spread of misinformation or stereotypes: As a cycling photographer, it is important to be mindful of the messages that your photographs convey. It is important to avoid contributing to the spread of misinformation or stereotypes, and to be mindful of how your photographs could be perceived by different audiences. This means being aware of the potential impact of your photographs, and being mindful of how they could be interpreted by others.
By following these ethical considerations, you can ensure that your cycling photographs are respectful and do not harm others.
Inspiration and Resources for Cycling Photography
Online Communities
There are numerous online communities that offer valuable resources for those interested in cycling photography. These platforms provide a platform for photographers to share their work, seek feedback, and learn from others. Here are some of the most popular online communities for cycling photography:
Instagram is a highly visual platform that is ideal for showcasing cycling photography. By following popular cycling photographers, you can gain inspiration and ideas for your own work. You can also use hashtags to make your work discoverable by a wider audience. Some of the most popular cycling-related hashtags on Instagram include #cycling, #biking, #bikephotography, and #cyclist.
Facebook groups
Facebook groups are a great way to connect with other cycling photographers and gain access to valuable resources. There are many groups dedicated to cycling photography, where members can share their work, ask for feedback, and learn from others. Some of the most popular cycling photography groups on Facebook include the “Cycling Photography” group and the “Bike Racing Photography” group.
Photography forums
Photography forums are a great resource for anyone looking to improve their skills as a photographer. These forums offer a platform for photographers to ask questions, share tips and techniques, and receive feedback on their work. Some of the most popular photography forums include the “Photography Talk” forum and the “Photography Critique” forum.
By engaging with these online communities, you can gain valuable insights into the world of cycling photography, connect with other photographers, and learn new techniques and tips for capturing stunning images.
Books and Magazines
- Cycling Photography Books
- “The Art of Cycling: A Guide to Cycling Photography” by James Smart
- “Cycling: A Photographic Guide” by Martin Willing
- “The Cyclist’s Guide to Photography” by Tom Eversfield
- Photography Magazines
- “Outdoor Photography”
- “Digital Photographer”
- “Black and White Photography”
- Cycling Publications
- “Cycling Weekly”
- “Cyclist”
- “Bicycling”
Cycling photography books provide an in-depth exploration of the art of capturing images of cyclists and their surroundings. These books cover various aspects of cycling photography, including techniques, equipment, and composition. They offer practical advice and inspiration for photographers of all levels, from beginners to professionals.
Photography magazines are a valuable resource for anyone interested in photography, including cycling photography. These magazines cover a wide range of topics, from the latest camera equipment to tips and techniques for improving your photography skills. They often feature articles on cycling photography, including interviews with professional photographers and tips for capturing stunning images.
Cycling publications are dedicated to all aspects of cycling, including photography. These publications cover the latest news and trends in cycling, as well as features on cycling photography. They often showcase the work of professional photographers and provide insights into the art of capturing images of cyclists and their surroundings.
Overall, books, magazines, and cycling publications provide a wealth of information and inspiration for anyone interested in cycling photography. They offer practical advice, tips, and techniques for capturing stunning images, as well as showcasing the work of professional photographers. By exploring these resources, photographers can improve their skills and gain a deeper appreciation for the art of cycling photography.
Workshops and Classes
For those looking to improve their cycling photography skills, workshops and classes can be an excellent resource. Here are some options to consider:
Online Workshops
One of the best ways to learn about cycling photography is by taking an online workshop. These workshops offer the convenience of learning from the comfort of your own home, and they often feature expert instructors who can provide personalized feedback. Some popular online workshops include:
Photography Classes
Taking a general photography class can also be beneficial for improving your cycling photography skills. These classes cover the basics of photography, such as composition, lighting, and exposure, which can all be applied to cycling photography. Some photography schools offer specialized classes for cycling photography, while others may offer general classes that can be adapted to the sport.
Cycling-Specific Photography Classes
For those who want to focus specifically on cycling photography, there are classes available that cater to this niche. These classes often cover topics such as shooting from a moving vehicle, capturing action shots, and working with cyclists and teams. Some examples of cycling-specific photography classes include:
- The Pro’s Guide to Cycling Photography
- Cycling Photography Masterclass
- Cycling Photography with Jonny Dull
In addition to these resources, there are also many online communities and forums dedicated to cycling photography, where photographers can share their work, ask for feedback, and learn from others in the field. By taking advantage of these resources, aspiring cycling photographers can improve their skills and capture stunning images of cyclists in action.
FAQs
1. What is photo cycling?
Photo cycling is a technique used in cycling photography where the photographer cycles alongside the subject or subjects they are photographing, capturing candid and dynamic images. This technique allows the photographer to capture images of cyclists in action, as well as the beautiful landscapes and scenery along the route.
2. What equipment do I need for photo cycling?
For photo cycling, you will need a camera with a good autofocus system and image stabilization, as well as a lens with a wide aperture for low light conditions. You will also need a bicycle that is suitable for cycling alongside the subject, as well as appropriate safety gear such as a helmet and reflective clothing.
3. How do I choose the right location for photo cycling?
When choosing a location for photo cycling, consider the type of scenery you want to capture and the time of day. Look for routes that offer a variety of landscapes, such as rolling hills, forests, and coastal views. Choose a time of day that offers the best light for photography, such as early morning or late afternoon.
4. How do I prepare for a photo cycling shoot?
Before embarking on a photo cycling shoot, make sure you have a plan in place. Research the route and identify any potential hazards or obstacles. Test your equipment beforehand to ensure it is in good working order. Bring along a cycling buddy or group for added safety and support. And be sure to stay hydrated and fueled throughout the shoot.
5. How do I capture candid and dynamic images while cycling?
To capture candid and dynamic images while cycling, consider using a long lens with a telephoto setting. This will allow you to capture images from a distance without disrupting the subject. Use a fast shutter speed to freeze the action and avoid blur. And try to anticipate the subject’s movements and position yourself in a strategic location to capture the best shots.
6. How do I edit and post-process my photo cycling images?
When editing your photo cycling images, start by adjusting the exposure and white balance to ensure the images look natural. Use a contrast and saturation adjustment to enhance the colors and bring out the details. Add a vintage or film-like effect to give the images a unique and timeless look. And don’t forget to add your signature to the images by adding your name or watermark.