Cycling is a great way to stay fit and healthy, but keeping your bike in top condition can be a challenge. One of the most important aspects of bike maintenance is organizing your bike parts. A well-organized bike workspace can save you time and frustration when it comes to repairs and upgrades. In this article, we’ll explore some tips and tricks for effectively organizing your bike parts. From storing your tools to organizing your cables and tubes, we’ll cover everything you need to know to keep your bike in tip-top shape. So, whether you’re a seasoned cyclist or just starting out, read on to discover how to make the most of your bike maintenance routine.
To effectively organize your bike parts, consider investing in some storage solutions such as bike storage racks, hooks, or a bike toolbox. Label each tool and part, so you can easily find what you need. Keep frequently used items within reach, and store less frequently used items in a designated area or on higher shelves. Consider organizing your parts by type and size, and use protective cases or covers to keep them clean and protected. Additionally, make sure to keep your workspace clean and well-lit to make organization easier. Regularly assess and adjust your organization system as needed to ensure efficiency and effectiveness.
Why is organizing bike parts important?
Improved accessibility
Organizing your bike parts is essential for improved accessibility. This means that it becomes easier to locate and retrieve the parts you need when you need them. This can save you a lot of time and effort, especially when you are in a hurry to get back on the road after a breakdown or when you are preparing for a race.
Here are some ways to improve accessibility when organizing your bike parts:
- Label each part: One of the most effective ways to improve accessibility is to label each part. This can be done by attaching a label to each part or by creating a list of parts with descriptions. Labeling helps you quickly identify the parts you need, especially when you have a large collection of parts.
- Group similar parts together: Another way to improve accessibility is to group similar parts together. For example, you can group all the bolts and screws together, or all the cables and housing together. This makes it easier to find the parts you need, as you can quickly identify the group they belong to.
- Use a storage system: Using a storage system, such as drawers or bins, can also improve accessibility. This allows you to organize your parts in a way that makes sense to you, and makes it easier to find the parts you need. It also helps to keep your parts organized and prevent them from getting mixed up.
By following these tips, you can improve accessibility when organizing your bike parts. This will save you time and effort, and make it easier to find the parts you need when you need them.
Prevent damage and wear
Proper organization of bike parts is crucial for preventing damage and wear. Here are some ways in which it helps:
- Reduces friction: Properly organized bike parts reduce friction between moving parts, which in turn reduces wear and tear. This is especially important for parts that are exposed to a lot of stress, such as the chain and cassette.
- Eases maintenance: When bike parts are organized and easy to access, it’s easier to perform regular maintenance tasks such as lubrication and cleaning. This helps to prevent the buildup of dirt and grime, which can cause damage over time.
- Improves safety: Disorganized bike parts can be hazardous. For example, if your brake pads are not properly aligned, they may not work effectively, which could lead to an accident. By keeping all parts organized and in their proper place, you can help ensure that your bike is safe to ride.
- Saves time and money: When bike parts are organized, it’s easier to find the parts you need when you need them. This saves time and money by reducing the need for repairs or replacements due to lost or misplaced parts.
Time-saving
Organizing your bike parts can save you a significant amount of time in the long run. Here are some reasons why:
- Easy access: When your bike parts are organized, you can quickly find the parts you need without having to search through a mess of tools and equipment. This can save you valuable time when you’re working on your bike, especially if you’re in a hurry to get back on the road.
- Efficient maintenance: Organizing your bike parts can make maintenance tasks more efficient. For example, if you need to replace a tube, you can easily access the tire and tools you need without having to dig through a disorganized box. This can save you time and effort in the long run.
- Reduced stress: When your bike parts are organized, you’re less likely to experience stress and frustration when working on your bike. This can be especially important if you’re working on a tight deadline or under pressure to get back on the road.
- Better inventory management: Organizing your bike parts can also help you keep track of your inventory. This can be especially important if you’re a professional mechanic or if you own a bike shop. By keeping track of your inventory, you can ensure that you always have the parts you need on hand, which can save you time and money in the long run.
What are the best ways to organize bike parts?
Use organizers and holders
When it comes to organizing your bike parts, using organizers and holders is one of the most effective methods. Bike organizers and holders come in a variety of shapes, sizes, and materials, making it easy to find one that fits your needs.
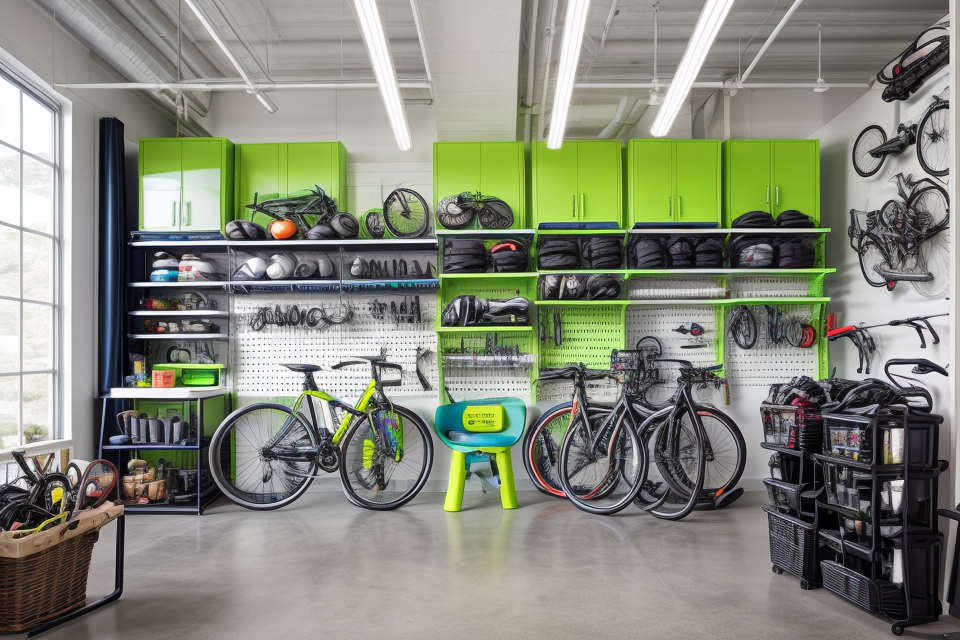
One of the most popular types of bike organizers is the wall-mounted organizer. These organizers are designed to be hung on the wall and can hold a variety of bike parts, including tires, tubes, and tools. They are a great space-saving option for those who have limited floor space or live in small apartments.
Another type of bike organizer is the stackable organizer. These organizers are designed to be stacked on top of each other and can hold a variety of bike parts, including pedals, chainrings, and cranksets. They are a great option for those who have a lot of bike parts to organize and need a more compact storage solution.
In addition to organizers, bike holders are also a great option for storing bike parts. Bike holders come in a variety of styles, including hooks, racks, and stands. They are designed to hold individual bike parts, such as handlebars, stems, and seatposts, and can be mounted on walls, ceilings, or floors.
Overall, using organizers and holders is a great way to effectively organize your bike parts. They provide a compact and space-saving solution for storing a variety of bike parts, and can be easily mounted on walls, ceilings, or floors. Whether you are a professional mechanic or a weekend cyclist, using organizers and holders can help keep your bike parts organized and easily accessible.
Categorize and label parts
When it comes to organizing bike parts, one of the most effective methods is to categorize and label them. This means grouping together parts that are similar in nature and function, and then assigning each group a unique identifier, such as a label or sticker.
One way to categorize bike parts is by their function. For example, all of the parts that are involved in the transmission of the bike, such as the gears, cassette, and chainrings, can be grouped together. Similarly, all of the parts that are involved in the braking system, such as the brake levers, calipers, and rotors, can be grouped together.
Another way to categorize bike parts is by their location on the bike. For example, all of the parts that are located on the handlebars, such as the stem, bars, and controls, can be grouped together. Similarly, all of the parts that are located on the frame, such as the fork, seatpost, and bottom bracket, can be grouped together.
Labeling the parts is an important step in the categorization process, as it allows you to easily identify and locate the parts that you need. You can use a variety of labels, such as stickers, tags, or even just a piece of electrical tape, to mark each group of parts. It’s also a good idea to include a brief description of the parts on the label, such as the part name or function, to make it easier to identify the parts when you need them.
Overall, categorizing and labeling your bike parts is a simple yet effective way to keep your workspace organized and efficient. By grouping similar parts together and assigning them unique identifiers, you can easily locate and access the parts you need, saving you time and frustration in the long run.
Invest in storage containers
Investing in storage containers is one of the most effective ways to organize your bike parts. There are various types of storage containers available in the market, such as tool boxes, bike stands, and wall-mounted racks. When choosing storage containers, it is important to consider the size and type of bike parts you have, as well as the space available in your workshop or garage.
Tool boxes are a popular choice for storing bike parts, as they provide a compact and portable solution. They come in different sizes and materials, such as plastic or metal, and can be easily locked to prevent theft. Bike stands are another option, as they provide a vertical storage solution that saves space. They can be adjusted to fit different types of bikes and are designed to hold the bike upright, making it easy to access the parts.
Wall-mounted racks are a great option for those who have limited floor space. They provide a compact and space-saving solution, and can be customized to fit the specific needs of your bike parts. They come in different sizes and materials, such as steel or aluminum, and can be mounted on the wall or ceiling.
Regardless of the type of storage container you choose, it is important to ensure that your bike parts are properly labeled and organized. This will make it easier to find the parts you need, and prevent confusion or misplacement. It is also important to keep your storage containers clean and well-maintained, as this will help prevent damage to your bike parts and extend their lifespan.
Tools and equipment organizers
One of the most effective ways to organize your bike parts is by using tools and equipment organizers. These organizers are designed specifically to hold and store different types of bike tools and equipment, making it easier to find what you need when you need it. Here are some examples of tools and equipment organizers that can help you get organized:
- Tool boxes: Tool boxes are a classic way to store bike tools and equipment. They come in a variety of sizes and materials, from plastic to metal, and can be customized to fit your specific needs. Some tool boxes have compartments for different types of tools, while others have open spaces for larger items.
- Pockets and pouches: Pockets and pouches are great for storing small tools and equipment, such as tire patches, tire irons, and chain cleaners. They can be attached to your bike or worn on your person, making it easy to access your tools while you’re on the go.
- Wall-mounted organizers: Wall-mounted organizers are a space-saving solution for storing bike tools and equipment. They come in a variety of shapes and sizes, from simple hooks to elaborate racks, and can be customized to fit your specific needs. Some wall-mounted organizers are designed specifically for holding bike pumps, while others have adjustable arms for holding a variety of tools.
- Cabinets and shelves: Cabinets and shelves are ideal for storing larger bike tools and equipment, such as floor pumps, tire changers, and workstands. They come in a variety of sizes and materials, from wood to metal, and can be customized to fit your specific needs. Some cabinets and shelves have adjustable shelves and drawers, while others have built-in lighting and ventilation.
By using tools and equipment organizers, you can keep your bike tools and equipment organized, easily accessible, and in good condition. This will save you time and frustration when you need to make repairs or maintenance on your bike, and will also help you keep your workspace clean and clutter-free.
Bicycle tire and inner tube organizers
Organizing your bike parts is an essential aspect of maintaining your bicycle in good condition. One of the most crucial components of your bike that require proper organization are the tires and inner tubes. These two parts are responsible for providing the necessary grip and cushioning to keep your bike running smoothly. In this section, we will discuss the best ways to organize your bicycle tires and inner tubes.
The first step in organizing your bike tires and inner tubes is to invest in a good organizer. There are several options available in the market, including wall-mounted organizers, stackable storage containers, and drawer organizers. Each of these options has its own set of benefits and drawbacks, so it’s essential to choose the one that best suits your needs.
Wall-mounted organizers are a popular choice for many cyclists because they take up minimal space and are easy to access. These organizers typically have several hooks or hangers that allow you to store your tires and inner tubes vertically. This design makes it easy to see which tires and inner tubes you have available, and it also helps to prevent damage to the tubes by keeping them from getting squashed.
Stackable storage containers are another option for organizing your bike tires and inner tubes. These containers come in various sizes and can be stacked on top of each other to save space. They are ideal for those who have limited storage space or need to transport their bike parts to different locations. Stackable containers can be labeled with the tire size and type, making it easy to identify the right tire when you need it.
Drawer organizers are a great option for those who have limited floor space. These organizers can be placed inside a drawer or cabinet and can be customized to fit the size and shape of your tires and inner tubes. They are also easy to access and can be labeled for easy identification.
Regardless of which organizer you choose, it’s essential to ensure that your bike tires and inner tubes are properly labeled and organized. This will help you to quickly identify the right tire for the right bike and prevent damage to the tubes. It’s also important to keep your tires and inner tubes clean and dry to prevent damage and ensure they last longer.
In conclusion, organizing your bike tires and inner tubes is crucial for maintaining your bicycle in good condition. There are several options available for organizing these parts, including wall-mounted organizers, stackable storage containers, and drawer organizers. Each of these options has its own set of benefits and drawbacks, so it’s essential to choose the one that best suits your needs. Proper labeling and maintenance will ensure that your bike tires and inner tubes last longer and perform better.
Bike part storage bins and drawers
Bike part storage bins and drawers are an excellent option for organizing your bike parts. They are specifically designed to hold and protect your bike parts, making it easy to find what you need when you need it.
There are several benefits to using bike part storage bins and drawers. Firstly, they provide a secure and protective storage solution for your bike parts. This is especially important if you have expensive or delicate parts that need to be protected from damage. Secondly, they help to keep your parts organized and easy to access. This can save you time and effort when you need to repair or maintain your bike.
When choosing bike part storage bins and drawers, it’s important to consider the size and type of parts you need to store. You’ll want to choose bins and drawers that are large enough to hold your parts, but not so large that they become unwieldy or difficult to manage. It’s also important to consider the material the bins and drawers are made from. Some materials, such as plastic, may not provide adequate protection for your parts, while others, such as metal, may be too heavy or difficult to move.
One popular option for bike part storage is to use clear plastic bins with lids. These bins allow you to see the parts inside, making it easy to find what you need. They are also lightweight and easy to move, making them a convenient option for small workshops or garages.
Another option is to use stackable drawers. These drawers are designed to be stacked on top of each other, providing a compact and space-efficient storage solution. They are also typically made from durable materials, such as metal or heavy-duty plastic, making them ideal for storing heavy or bulky parts.
When using bike part storage bins and drawers, it’s important to label them clearly. This will make it easy to find the parts you need, and prevent confusion or misunderstandings. You may also want to consider grouping similar parts together in the same bin or drawer, to make it easier to find what you need.
Overall, bike part storage bins and drawers are an excellent option for organizing your bike parts. They provide a secure and protective storage solution, while also helping to keep your parts organized and easy to access. When choosing bins and drawers, consider the size and type of parts you need to store, as well as the material they are made from. And don’t forget to label them clearly and group similar parts together for easy access.
Categorizing bike parts
Categorizing bike parts is a crucial step in organizing them effectively. It involves grouping together parts that are similar in function or purpose. By categorizing your bike parts, you can easily locate the parts you need when you need them.
There are several ways to categorize bike parts, including:
- By function: This involves grouping together parts that perform similar functions, such as brake levers, shifters, and handlebars.
- By type: This involves grouping together parts that are similar in type, such as tires, wheels, and frames.
- By brand: This involves grouping together parts from the same brand, such as Shimano components or SRAM parts.
Once you have categorized your bike parts, you can then organize them within each category. For example, within the category of brake levers, you can organize them by the type of brake system they are compatible with, such as mechanical or hydraulic.
By taking the time to categorize your bike parts, you can save time and effort when it comes to assembling and maintaining your bike. Additionally, categorizing your parts can help you identify any missing or damaged parts, making it easier to order replacements when needed.
Drivetrain components
Organizing your bike parts is crucial to ensure smooth and efficient cycling. One of the most critical components of your bike is the drivetrain, which includes the crankset, bottom bracket, chainrings, cassette, and derailleurs. To effectively organize your drivetrain components, follow these steps:
- Clean and Lubricate: Before organizing your drivetrain components, make sure they are clean and well-lubricated. Use a bike-specific lubricant to protect your components from rust and corrosion.
- Group Together: Organize your drivetrain components by grouping them together based on their function. Place your crankset, bottom bracket, and chainrings in one area, and your cassette and derailleurs in another.
- Label and Number: Label each component and assign a number for easy identification. This will help you to quickly locate the right component when you need to replace or adjust it.
- Inspect and Repair: Inspect your drivetrain components for any signs of wear or damage. Replace any damaged or worn-out components to ensure smooth and efficient shifting.
- Store in a Protective Case: Store your drivetrain components in a protective case or bag to prevent damage during transportation or storage.
By following these steps, you can effectively organize your drivetrain components and ensure smooth and efficient cycling.
Suspension components
Organizing your bike parts can make your life as a cyclist much easier. One crucial aspect of organization is how you store your suspension components. Suspension components are essential for a smooth and comfortable ride, so it’s important to keep them in good condition and easy to access. Here are some tips for effectively organizing your suspension components:
- Store suspension components separately: It’s important to store your suspension components separately from other bike parts to prevent damage. Suspension forks and shocks should be stored in a secure location where they won’t be bumped or knocked around.
- Use foam or other padding: To protect your suspension components from scratches and dents, consider using foam or other padding to cushion them. This will also help to prevent damage during transportation.
- Keep them clean: Regular cleaning of your suspension components will help to prolong their lifespan. Use a mild detergent and water to clean your suspension components, and be sure to rinse them thoroughly before drying.
- Inspect for wear and tear: Before storing your suspension components, inspect them for any signs of wear and tear. If you notice any damage, it’s important to address it before storing them away.
- Consider using storage solutions: There are many storage solutions available for bike parts, including dedicated bike storage racks and bags. These can help to keep your suspension components organized and accessible.
By following these tips, you can ensure that your suspension components are well-organized and ready to use whenever you need them. Proper organization will not only save you time and hassle, but it will also help to prolong the lifespan of your suspension components.
Wheels and tires
Organizing your bike parts is crucial for easy access and maintenance. One of the most important parts to organize are your wheels and tires. Here are some tips on how to effectively organize them:
- Sort by size: Sort your wheels and tires by size, either 26 inches or 700c. This will make it easier to find the right tire when you need it.
- Group by type: Group your wheels and tires by type, such as clincher or tubular. This will help you keep track of which tires work best with which wheels.
- Label and document: Label each wheel and tire with its size and type, and keep a record of the tire pressure and rim size. This will help you quickly identify the right tire for your bike.
- Store in a designated area: Dedicate a specific area in your workshop or garage for storing your wheels and tires. This will keep them organized and easily accessible.
- Inspect regularly: Regularly inspect your wheels and tires for any damage or wear, and replace them as needed. This will ensure that your bike is always in good working condition.
By following these tips, you can effectively organize your bike parts and ensure that you have easy access to the right parts when you need them.
Labeling bike parts
Labeling bike parts is an effective way to keep track of your inventory and quickly identify the different components of your bike. Here are some tips for labeling your bike parts:
- Use clear and concise labels: Make sure the labels you use are easy to read and understand. Avoid using vague or ambiguous labels that could lead to confusion.
- Label each part individually: Label each part of your bike separately, so you can easily identify and locate the component you need.
- Use a consistent labeling system: Choose a labeling system that works for you and stick to it. This could be as simple as labeling each part with a number or letter, or using a more detailed system that includes the name of the component and its function.
- Include important information: In addition to the name or number of the component, you may want to include other important information on the label, such as the size or thread pitch.
- Use durable labels: Choose labels that are made from durable materials that can withstand the conditions in which they will be used. This could include weather-resistant materials or labels that are attached using a strong adhesive.
- Organize your labels: Once you have labeled all of your bike parts, consider organizing them in a way that makes sense to you. This could include grouping similar components together or arranging them in the order in which they are installed on the bike.
By following these tips, you can ensure that your bike parts are well-labeled and easy to locate when you need them.
Using a bike part inventory checklist
When it comes to organizing your bike parts, using a bike part inventory checklist is an effective method. This method involves creating a comprehensive list of all the bike parts you own, and then organizing them in a way that makes sense for you.
Creating a bike part inventory checklist is a simple process. Start by making a list of all the bike parts you own, including the make, model, and size of each part. Be sure to include all the parts you will need for your bike, such as the frame, wheels, pedals, handlebars, and brakes. Once you have made your list, you can start organizing your parts in a way that makes sense for you.
One effective way to organize your bike parts is by creating a system of categorization. For example, you can categorize your parts by their function, such as the parts that are used for steering, braking, or shifting. You can also categorize your parts by their location on the bike, such as the parts that are located on the handlebars or the parts that are located on the frame.
Another way to organize your bike parts is by creating a visual map of your bike. This involves drawing a diagram of your bike and labeling each part with its corresponding location on the bike. This can help you quickly identify which parts you need when you are working on your bike, and it can also help you to see how the different parts of your bike fit together.
When it comes to organizing your bike parts, it is important to consider your own needs and preferences. Some people prefer to organize their parts by function, while others prefer to organize them by location. Some people prefer to use a visual map, while others prefer to use a simple list. Ultimately, the most important thing is to find a method that works for you and that helps you to easily access and use your bike parts.
Labeling bike parts with permanent markers
When it comes to organizing bike parts, labeling them with permanent markers is an effective and straightforward method. This approach allows you to quickly identify each component and helps prevent confusion or misplacement. Here’s how you can implement this technique:
- Choose the right markers: Select a permanent marker that can withstand harsh conditions and resist fading over time. Look for markers labeled as waterproof, weather-resistant, or UV-resistant to ensure durability.
- Label each part: Start by labeling each bike part with a clear and concise description. Be specific and use terms that make sense to you, such as “rear derailleur” or “front brake lever.” This will make it easier for you to locate and identify each part in the future.
- Label in a visible location: Choose a spot on each part where the label will be visible and easily readable. Avoid placing labels in areas that could interfere with the bike’s function or appearance, such as the brake lines or the center of the tire.
- Create a master list: In addition to labeling individual parts, consider creating a master list of all your bike components. This list can serve as a reference when you need to reassemble your bike or order replacement parts. Include details such as the part’s name, location on the bike, and any specific notes or instructions.
- Update the labels as needed: As you make changes to your bike or upgrade components, be sure to update the labels accordingly. This will help ensure that your organization system remains accurate and up-to-date.
By following these steps, you can effectively label your bike parts with permanent markers, making it easier to keep your workspace organized and streamline your maintenance and repair processes.
How can I optimize my bike part organization system?
Regularly review and update organization system
One of the most effective ways to optimize your bike part organization system is to regularly review and update it. This means taking the time to assess the current state of your organization and making changes as needed to ensure that it continues to work effectively. Here are some tips for how to do this:
- Set aside dedicated time for organization: To ensure that you are able to thoroughly review and update your organization system, it is important to set aside dedicated time for this task. This might be once a week, once a month, or once a quarter, depending on your schedule and the size of your bike part collection.
- Start by assessing your current system: Begin by taking a close look at your current organization system and assessing its effectiveness. This might involve asking yourself questions such as: Are my bike parts easy to find and access? Are they organized in a logical and intuitive way? Are there any areas where the system could be improved?
- Identify areas for improvement: Once you have assessed your current system, identify areas where it could be improved. For example, you might find that certain types of bike parts are not well-organized or that you are having difficulty keeping track of your inventory.
- Make changes as needed: Based on your assessment, make changes to your organization system as needed. This might involve rearranging your storage space, implementing new labeling systems, or investing in additional storage containers.
- Monitor and adjust over time: It is important to continue monitoring and adjusting your organization system over time to ensure that it remains effective. This might involve making small changes on an ongoing basis or conducting more comprehensive reviews at regular intervals.
By regularly reviewing and updating your bike part organization system, you can ensure that it continues to work effectively and that you are able to find the parts you need quickly and easily.
Invest in quality storage solutions
When it comes to organizing your bike parts, investing in quality storage solutions is key. Not only will it make your life easier, but it will also help protect your bike parts from damage. Here are some tips for investing in quality storage solutions:
- Consider your space: Before investing in any storage solutions, consider the space you have available. Make sure to measure the area where you plan to store your bike parts to ensure that the storage solution you choose will fit.
- Choose the right materials: Different bike parts require different materials for storage. For example, carbon fiber parts may require a more protective storage solution than metal parts. Choose materials that are durable and can protect your bike parts from damage.
- Look for customizable options: Some storage solutions are customizable, which can be a great option if you have a lot of different bike parts. Customizable storage solutions can help you maximize your space and keep your bike parts organized.
- Invest in protective cases: Protective cases can be a great option for storing sensitive bike parts, such as electronic components. Look for cases that are designed specifically for your bike parts to ensure a perfect fit.
- Consider portability: If you plan to move your bike parts around frequently, portability is key. Look for storage solutions that are easy to transport and can be moved quickly and easily.
By investing in quality storage solutions, you can optimize your bike part organization system and keep your bike parts protected and organized.
Use vertical space for storage
When it comes to organizing your bike parts, utilizing vertical space is a great way to maximize the storage capacity of your workspace. By taking advantage of the vertical space in your garage or storage area, you can keep your bike parts organized and easily accessible. Here are some tips for using vertical space to store your bike parts:
- Install shelves: Shelves are a great way to utilize vertical space in your workshop or storage area. You can install adjustable shelves that can be moved around to accommodate different sizes of bike parts. This will help you keep your parts organized and easily accessible.
- Use wall-mounted storage systems: Wall-mounted storage systems are designed specifically for bike parts. They are adjustable and can be customized to fit the size and shape of your bike parts. This type of storage system is ideal for small spaces as it helps to maximize the available vertical space.
- Hang your tools: If you have a lot of bike tools, consider hanging them on the wall. This will help to keep them organized and easily accessible. You can use a pegboard or a tool holder to keep your tools organized.
- Use baskets and crates: Baskets and crates are great for storing smaller bike parts. You can use them to store nuts, bolts, and other small parts. This will help to keep your parts organized and easy to find.
- Invest in a bike part organizer: There are many bike part organizers available on the market. These organizers are designed to hold different types of bike parts and can be hung on the wall or placed on a shelf. They are a great way to keep your parts organized and easily accessible.
By utilizing vertical space to store your bike parts, you can optimize your organization system and make the most of your available storage space.
Regular maintenance and cleaning
Regular maintenance and cleaning are essential components of an effective bike part organization system. Not only do they help to ensure that your bike is functioning at its best, but they also help to prevent damage to your bike parts and extend their lifespan. Here are some tips for regular maintenance and cleaning:
Schedule regular maintenance checks
It is important to schedule regular maintenance checks to ensure that your bike is in good working condition. This can include checking the tire pressure, lubricating the chain, and inspecting the brakes and tires. By doing this regularly, you can catch any issues before they become major problems.
Clean your bike after each ride
After each ride, it is important to clean your bike to remove any dirt, dust, or debris that may have accumulated. This can help to prevent damage to your bike parts and ensure that they are functioning properly. Use a soft cloth or sponge to wipe down your bike, and be sure to clean the chain, tires, and brakes thoroughly.
Use the right cleaning supplies
When cleaning your bike, it is important to use the right cleaning supplies. Avoid using harsh chemicals or abrasive cleaners, as these can damage your bike parts. Instead, use a gentle bike cleaner and a soft cloth or sponge to clean your bike. Be sure to read the instructions carefully and follow them closely.
Store your bike parts properly
When you are not using your bike, it is important to store your bike parts properly to prevent damage and ensure that they are ready to use when you need them. This can include storing your bike in a dry, cool place, and covering it to protect it from dust and dirt. Be sure to keep your bike parts organized and easily accessible, so that you can find what you need quickly and easily.
By following these tips, you can optimize your bike part organization system and ensure that your bike is functioning at its best. Regular maintenance and cleaning are essential components of any effective bike part organization system, and by incorporating them into your routine, you can extend the lifespan of your bike parts and prevent damage to your bike.
Adjusting and fine-tuning bike parts
Properly adjusting and fine-tuning your bike parts is crucial for ensuring optimal performance and preventing mechanical issues. Here are some tips for adjusting and fine-tuning your bike parts:
Inspect your bike parts regularly
Regularly inspecting your bike parts can help you identify any worn or damaged components that need to be adjusted or replaced. Look for signs of wear, such as rust, corrosion, or bent parts, and make sure all components are properly tightened and aligned.
Use the correct tools
Using the correct tools is essential for making accurate adjustments and preventing damage to your bike parts. For example, use a torque wrench to properly tighten bolts and avoid overtightening, which can strip threads or damage components.
Adjust your brakes
Adjusting your brakes is crucial for ensuring safe and reliable stopping power. Make sure your brake pads are properly aligned with the brake caliper and that the brake lever is adjusted to the correct tension.
Fine-tune your gears
Fine-tuning your gears can help you achieve smoother shifting and more efficient pedaling. Adjust the tension of your gear cables and make sure your gears are properly aligned with your chainrings.
Check your tire pressure
Properly inflated tires can improve your bike’s performance and prevent flats. Check your tire pressure regularly and adjust as needed, usually between 6 and 10 bar (90 and 150 psi) for most road bikes.
By following these tips, you can optimize your bike part organization system and ensure your bike is performing at its best.
Properly storing tools and equipment
One of the most important aspects of organizing your bike parts is properly storing your tools and equipment. Here are some tips to help you do just that:
- Choose the right storage containers: Depending on the type of tools and equipment you have, you’ll need to choose the right storage containers. For example, if you have small tools like screwdrivers and wrenches, you might want to use a plastic storage case or a pegboard with small bins. If you have larger tools like bike stands and work benches, you might want to use a large storage cabinet or a shed.
- Organize your tools by type and use: Organizing your tools by type and use will make it easier to find what you need when you need it. For example, you might want to keep your bike maintenance tools in one container, your repair tools in another, and your cleaning supplies in a third.
- Label your containers: Labeling your containers will make it even easier to find what you need. Use clear labels and make sure they are easy to read. You might also want to include a list of the contents of each container.
- Store your tools in a dry, secure location: It’s important to store your tools in a dry, secure location where they won’t be damaged by moisture or exposed to the elements. If you don’t have a dedicated tool storage area, you might want to consider building a small shed or using a plastic storage bin with a lid.
- Keep your tools clean and well-maintained: Regular maintenance will help keep your tools in good condition and prevent rust and corrosion. Wipe down your tools after each use and oil any moving parts. If you have power tools, make sure to unplug them when not in use and keep the cords clean and well-organized.
By following these tips, you can ensure that your tools and equipment are well-organized and easy to access when you need them.
How can I keep my bike parts organized while riding?
Bike bags and saddle bags
When it comes to keeping your bike parts organized while riding, bike bags and saddle bags are essential tools to have. These bags are designed to attach to your bike and provide a convenient way to carry your gear with you while you ride.
Bike bags are typically larger and more spacious than saddle bags, making them a great option for carrying larger items like helmets, jackets, and spare clothing. They can be attached to the rear carrier or the front of the bike, depending on the type of bag and your preference.
Saddle bags, on the other hand, are smaller and more compact, making them ideal for carrying items like snacks, wallets, and phone. They can be attached to the sides of your saddle and provide easy access to your gear while you ride.
To effectively organize your bike parts using bike bags and saddle bags, consider the following tips:
- Label your bags: To ensure that you can easily find what you need, label each bag with its contents. This will save you time and frustration when you’re looking for a specific item.
- Use waterproof bags: If you’re carrying items that are susceptible to water damage, make sure to use waterproof bags. This will protect your gear from the elements and keep it dry.
- Keep your bags organized: When packing your bags, make sure to keep your items organized. Place heavier items at the bottom of the bag and lighter items on top. This will prevent your bags from tipping over and make it easier to access your gear.
- Secure your bags: Make sure that your bags are securely attached to your bike to prevent them from coming loose during your ride. This will ensure that your gear stays with you and doesn’t get left behind.
By following these tips, you can effectively organize your bike parts using bike bags and saddle bags. These bags will provide you with the convenience and flexibility you need to enjoy your ride while keeping your gear safe and secure.
Tool kits and multi-tools
As a cyclist, it is important to be prepared for any maintenance or repairs that may arise during a ride. Carrying a tool kit and a multi-tool can help you to quickly address any issues that may arise.
Tool kits typically include basic tools such as a wrench, screwdriver, and pliers. These tools are essential for making simple adjustments and repairs on the go. Multi-tools, on the other hand, are more compact and contain a variety of tools in one unit. They often include a range of screwdrivers, a wrench, and sometimes even a knife or pliers.
When selecting a tool kit or multi-tool, it is important to consider the type of riding you will be doing. For example, if you plan to ride in remote areas, you may want to bring a more comprehensive tool kit. If you plan to ride primarily on paved roads, a multi-tool may be sufficient.
In addition to the tools themselves, it is important to have a secure way to carry them. Many cyclists choose to attach their tool kit or multi-tool to their bike using a mount or strap. This allows them to easily access the tools when needed, without having to carry them in a bag or pocket.
Overall, carrying a tool kit and multi-tool can provide peace of mind and help you to quickly address any issues that may arise during a ride. By selecting the right tools and carrying them securely, you can ensure that you are prepared for any situation that may come up.
Wearable bike accessories
Organizing your bike parts while riding can be a challenge, but with the right wearable bike accessories, it can be done easily. Here are some wearable bike accessories that can help you keep your bike parts organized while riding:
Bike lights
Bike lights are essential for any cyclist, as they help you see and be seen. But they can also be used to keep your bike parts organized. For example, you can attach a small LED light to your water bottle cage to keep it visible in low light conditions. This way, you won’t have to search for your water bottle in the dark, and you’ll be able to keep your bike parts organized.
Handlebar mounts
Handlebar mounts are another useful wearable bike accessory for keeping your bike parts organized. You can use them to attach your phone, GPS, or other small items to your handlebars. This way, you can keep your hands free and your items within reach while riding. Additionally, handlebar mounts can be adjusted to fit different sizes and shapes of handlebars, making them a versatile option for organizing your bike parts.
Saddle bags
Saddle bags are a popular option for cyclists who want to carry more than just a few essentials. They can be used to carry a variety of items, including tools, spare tubes, and extra clothing. Saddle bags are typically made of durable materials like nylon or canvas and can be secured to your saddle or seatpost. This way, you can keep your bike parts organized and within reach while riding.
Hydration packs
Hydration packs are another wearable bike accessory that can help you keep your bike parts organized while riding. They are designed to hold a water bladder and provide easy access to your water while riding. Many hydration packs also have pockets for carrying small items like keys, gels, and snacks. This way, you can keep your bike parts organized and within reach while riding, and stay hydrated at the same time.
In conclusion, there are many wearable bike accessories that can help you keep your bike parts organized while riding. From bike lights to saddle bags, there is a wide range of options available to suit your needs. By using these accessories, you can keep your bike parts organized and within reach while riding, making your cycling experience more enjoyable and efficient.
Hydration packs and water bottles
Hydration packs and water bottles are essential accessories for cyclists, especially during long rides. Keeping your bike parts organized while riding is important to ensure your safety and comfort. Here are some tips on how to use hydration packs and water bottles effectively:
- Choose the right hydration pack: There are different types of hydration packs available in the market, each with its own features and benefits. When choosing a hydration pack, consider your riding style, the amount of water you need, and the terrain you’ll be riding on.
- Place the hydration pack correctly: Make sure the hydration pack is placed securely on your bike to prevent it from moving around while you ride. Adjust the straps and clips to ensure that the pack stays in place.
- Fill the hydration pack with water: Fill the hydration pack with water before you start your ride. This will save you time and effort during the ride, and you won’t have to stop to refill your water bottle.
- Use a water bottle holder: If you prefer to use a water bottle instead of a hydration pack, use a water bottle holder to secure it to your bike. Choose a holder that is compatible with your bike’s frame and size.
- Drink water regularly: Drink water regularly during your ride to stay hydrated. This will help you maintain your energy levels and prevent dehydration.
- Clean your hydration pack and water bottle: After each ride, clean your hydration pack and water bottle to prevent bacteria growth and ensure they are ready for your next ride. Use a mild detergent and water to clean the hydration pack, and rinse the water bottle with a bottle brush.
Bike phone mounts and holders
If you’re like most cyclists, you probably use your phone to navigate, track your rides, or listen to music while you ride. However, carrying your phone with you while cycling can be a hassle, especially if you don’t have a good way to keep it secure and accessible. This is where bike phone mounts and holders come in handy.
There are many different types of bike phone mounts and holders available on the market, each with its own unique features and benefits. Here are a few options to consider:
Bar mounts
Bar mounts are one of the most popular types of bike phone holders. These mounts attach to your handlebar and hold your phone in place using a flexible arm or clamp. Bar mounts are a great option if you want to keep your phone within easy reach while you ride, but you don’t want to obstruct your view or get it in the way of your handlebars.
Seat post mounts
Seat post mounts are another popular option for bike phone holders. These mounts attach to your seat post and hold your phone in place using a flexible arm or clamp. Seat post mounts are a good option if you want to keep your phone out of the way while you ride, but you still want to be able to access it easily.
Water bottle mounts
Water bottle mounts are a convenient option for bike phone holders. These mounts attach to your water bottle cage and hold your phone in place using a flexible arm or clamp. Water bottle mounts are a great option if you want to keep your phone secure and accessible while you ride, but you don’t want to obstruct your view or get it in the way of your handlebars.
Out-front mounts
Out-front mounts are a more advanced option for bike phone holders. These mounts attach to your handlebar and hold your phone in place using a flexible arm or clamp. Out-front mounts are a good option if you want to keep your phone within easy reach while you ride, but you don’t want to obstruct your view or get it in the way of your handlebars.
Regardless of which type of bike phone mount or holder you choose, it’s important to make sure it’s securely attached to your bike and that your phone is securely attached to the mount. This will help ensure that your phone stays where you can easily access it while you ride, but it won’t obstruct your view or get in the way of your handlebars.
Cycling GPS and navigation devices
Cycling GPS and navigation devices are a popular tool for cyclists to keep track of their route and distance while riding. These devices can also help you to stay on track and avoid getting lost. However, when it comes to organizing your bike parts, these devices can be a bit of a challenge. Here are some tips to help you keep your cycling GPS and navigation devices organized while riding:
- First, make sure that your device is securely attached to your bike. This will prevent it from bouncing around and getting damaged while you ride. There are many different options for attaching a GPS device to your bike, including mounts that attach to your handlebars or seat post.
- Next, consider investing in a case or protective cover for your device. This will help to keep it safe from the elements and prevent it from getting scratched or damaged. There are many different types of cases available, from neoprene sleeves to hard plastic cases.
- If you have multiple devices, such as a phone and a dedicated GPS device, consider using a mount that allows you to switch between the two easily. This will save you time and hassle when you need to change devices mid-ride.
- Finally, make sure that you have all the necessary cables and chargers for your device. This will ensure that you can charge your device when you need to, and that you don’t lose any important data or settings.
By following these tips, you can keep your cycling GPS and navigation devices organized while riding, and ensure that you have all the information you need to stay on track and make the most of your ride.
The benefits of a well-organized bike parts system
Having a well-organized bike parts system can provide several benefits for both the rider and the bike itself. One of the most obvious benefits is improved accessibility. When your bike parts are organized and easy to access, you can quickly identify and replace any broken or damaged parts. This can save you time and hassle, especially if you’re in a hurry to get back on the road.
Another benefit of a well-organized bike parts system is increased efficiency. When your bike parts are well-organized, you can easily find the parts you need, and you can quickly install them. This can save you time and effort, and it can also help you to be more efficient in your repairs.
In addition to these benefits, a well-organized bike parts system can also help to improve the overall performance of your bike. When your bike parts are well-organized, you can easily access and replace any worn or damaged parts, which can help to improve the overall performance of your bike. This can be especially important if you’re an avid cyclist who relies on your bike for transportation or for recreation.
Finally, a well-organized bike parts system can also help to improve the aesthetics of your bike. When your bike parts are well-organized, they can be easily seen and accessed, which can help to improve the overall appearance of your bike. This can be especially important if you’re a competitive cyclist who wants to ensure that your bike looks as good as it performs.
Encouragement to start organizing bike parts today
Don’t Wait: Start Organizing Your Bike Parts Today!
Organizing your bike parts is an essential aspect of bike maintenance that should not be overlooked. Not only does it keep your bike in good working condition, but it also ensures your safety while riding. The longer you wait to start organizing your bike parts, the more difficult it will become, and the more time you will waste searching for the right parts when you need them.
Easy Steps to Get Started
Organizing your bike parts can seem like a daunting task, but it doesn’t have to be. Here are some easy steps to get started:
- Gather all your bike parts: This includes everything from your pedals to your handlebars, wheels, and frame.
- Sort the parts: Sort the parts into categories, such as handlebars, gears, brakes, and wheels.
- Label the parts: Label each category with a description of the parts included in that category.
- Store the parts: Store the parts in a designated area, such as a toolbox or shelf, where they can be easily accessed and seen.
The Benefits of Organization
Organizing your bike parts has many benefits, including:
- Saves time: When you need a specific part, you can quickly find it without having to search through a disorganized mess.
- Prevents damage: Organizing your bike parts can prevent damage to them, as well as to your bike.
- Increases safety: When you know where each part is, you can quickly and easily make repairs, which can help keep you safe while riding.
Take Action Today
Don’t wait any longer to start organizing your bike parts. Take action today and reap the benefits of a well-organized bike. Remember, the longer you wait, the more difficult it will become, and the more time you will waste searching for the right parts when you need them. Start today and keep your bike in good working condition, and ensure your safety while riding.
Resources for further information and inspiration
One of the most effective ways to keep your bike parts organized while riding is to invest in a good quality bike bag or backpack. These bags are specifically designed to hold all of your bike essentials, including tools, tubes, tires, and more. They are also designed to be easily accessible while you are on the go, so you can quickly grab what you need without having to stop and search through your bags.
Another great resource for keeping your bike parts organized while riding is to make use of bike racks and carriers. These racks and carriers are designed to hold your bike and all of your gear, making it easy to transport your bike and all of your essentials to your destination. They are also designed to be easily accessible, so you can quickly grab what you need while on the go.
In addition to bike bags and racks, there are also a number of online resources available to help you keep your bike parts organized while riding. These resources include online forums, blogs, and websites dedicated to cycling and bike maintenance. These resources are a great way to learn from other cyclists and get inspiration for new ways to organize your bike parts.
Finally, don’t forget about the power of organization apps and software. There are a number of apps and software programs available that can help you keep track of your bike parts and all of your cycling gear. These apps can help you create inventories of your gear, track maintenance schedules, and more. They are a great way to stay organized and ensure that you always have what you need when you go out for a ride.
FAQs
1. What are some ways to organize bike parts?
There are several ways to organize bike parts, depending on your preference and the amount of space you have available. One common method is to use bike tool bags or boxes to store all of your tools and small parts in one place. Another option is to use hooks or hangers to store your bike clothes and accessories, such as gloves and helmets. You can also use pegboards or wall-mounted storage systems to hang your tools and other items.
2. How should I store my bike parts?
When storing your bike parts, it’s important to make sure they are protected from damage and rust. You should clean and lubricate your parts before storing them, and wrap or cover any sensitive components to prevent scratches or other damage. It’s also a good idea to label your storage containers or bins to keep track of your parts and make it easier to find what you need when you’re ready to work on your bike.
3. How can I keep track of all my bike parts?
Keeping track of all your bike parts can be a challenge, especially if you have a large collection of tools and accessories. One way to stay organized is to create a list or inventory of all your parts and tools, and keep it in a safe place where you can easily access it. You can also take photos or make a diagram of your parts and tools to help you remember where everything is stored.
4. What are some tips for organizing my workspace?
Organizing your workspace is an important part of keeping your bike parts organized. Here are a few tips for creating a functional and efficient workspace:
* Clear a dedicated space for your bike work, and keep it free of clutter and distractions.
* Use shelves or storage units to keep your tools and parts organized and within reach.
* Label your tools and storage containers to make it easier to find what you need.
* Keep your work area well-lit and ventilated for comfort and safety.
* Consider investing in a bike stand or workbench to make it easier to work on your bike.